


I am Retrotation, and I will be your host today. Just earlier I unleashed my latest release unto the dubstep world entitled, “I Dream of Dragons.” Sit and listen, and please feel free to close your eyes and enter into the realm of your imagination.
Below, you will find the source files to this piece. Reason 5.0 is required:
I Dream of Dragons.RNS
The individual combinator patches:
1. Bell Dream
2. Gimme Bass
3. Sidechain Drum Unit
—
Let us discuss how these instruments work. I have taken the liberty of highlighting green in the following images what I would consider the ‘power knobs.’ These knobs are the ones you can readily use to redefine and fine-tune the instrument without breaking it. Starting with the “Bell Dreams” patch:
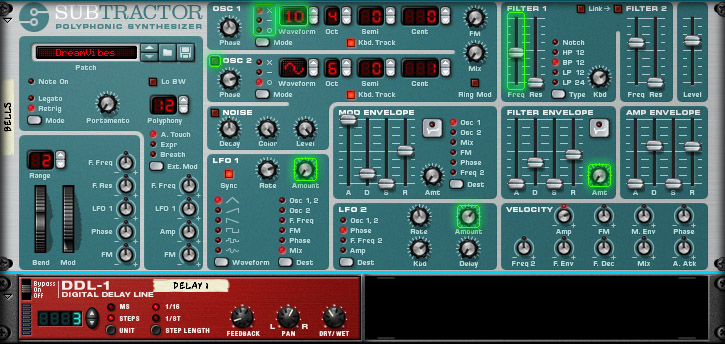
Starting from the top-left, you will find the MODE and WAVEFORM options under Oscillator 1. Before sorting through the waveform options, I would recommend getting a feel for each different mode. This way you can predict the changes it will make upon the waveform and therefor be able to further refine the exact sound you intended!
Below Oscillator 1, I have highlighted the ON/OFF button for Oscillator 2. Pretty self explanatory, explore it in the same way you did with Oscillator 1. Just don’t forget to turn up the MIX knob to the half-way mark before you start… this is important, as that way you can accurately judge how well the two oscillators will play together.
Moving over to the Filter 1 FREQUENCY slider, you will not need to make many adjustments here. Because of the instrument’s type and that the filter is set to a Bandpass (BP 12), you will only want to fine-tune the slider a few points up or down to find a nice balance that retains both the high-end and the initial low-end “clunk” or hit (it is a bell, after all!). If you made serious adjustments to my oscillator settings, you may want to fine-tune the KBD amount also.
Next up, let’s take a look at the FILTER ENVELOPE AMOUNT. This is a neat way of adding more high-end while preserving the low-end clunk. The magic is all in the ADSR envelopes… Add a small amount to your liking, but I don’t suggest turning this knob up to the max!
Lastly, the LFOs are also integral to this instrument’s sound. LFO 2 is a nice fine-tuning tool that adds width to the original sound. Give it a try and a nudge back to zero and you will see what I mean. LFO 1 is a little different – by default on this instrument it’s destination is set to mess with the mix between the two oscillators. Turn it up to give a wavey texture to your sound!
Now press the ‘TAB’ key on your keyboard while inside Reason. Notice that LFO 1 is also connected to the PAN knob of the Delay unit. This gives the delay line more width in your mix. Try removing the wire to hear what I mean. I would also like to add that using headphones while making panning adjustments in your mix is very helpful. Don’t make the mistake of using speakers! You will not be able to accurately hear your spatial adjustments.
—
This is the “Gimme Bass” patch, which is a useful basis for designing your thick and gritty basslines:
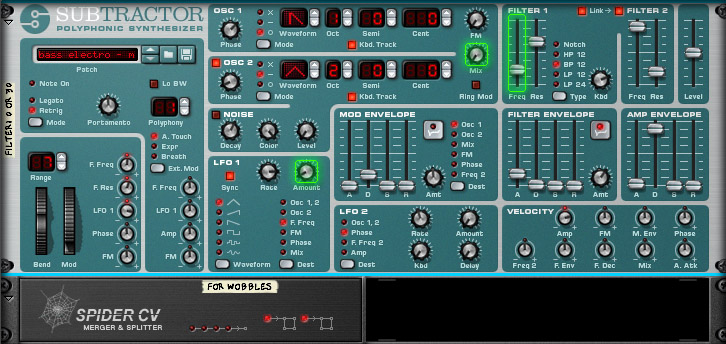
Feel free to try different oscillator settings and modes on this one. You will get a great sound without much repair work needing to be done on the rest of the instrument. Try adding in the second oscillator for more complex sounds through the MIX knob(this will take way power from the sub-line, however).
Also, for a nice pure sub-line, turn the Filter 1 FREQ slider down to 0.
LFO1 is for the wobblez. More importantly, press the “TAB” key on your keyboard (or alternatively mouse-over the picture above) and take a look at the Spider CV Merger & Splitter. LFO1 is already connected to Split A, and Split A is also connected to Split B – this gives you a total of 5 LFO1’s to layer throughout the instrument itself (and 2 inverses, should you be creative enough to use them successfully). Some great things to connect these CVs to:
1. Distortion Unit’s Damage Control
2. Distortion Unit’s P1 and P2 (success here depends upon the distortion type you are using)
3. Subtractor’s Mod Wheel
4. Vocoder’s Shift knob
These are, of course, only SOME of the things you can attach these CVs to. Explore beyond! This list is just some of the things I’ve noticed come out to great effect in this particular instrument – you will that find other things manipulate the sound better when working with different instrument patches.
Okay, enough about LFOs. Scroll down the instrument a little bit and you’ll find the first distortion patch in the chain:
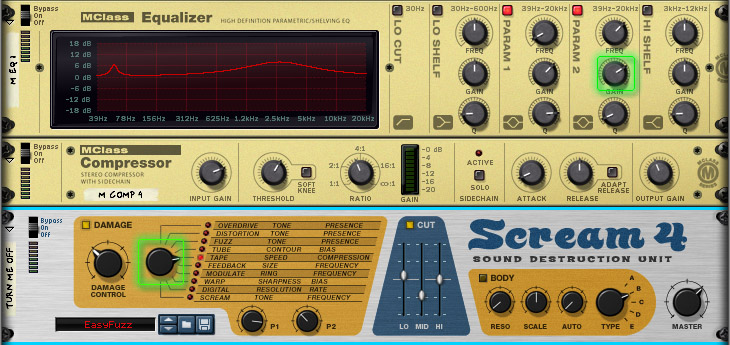
Switch the Damage Type to something else, such as “TUBE,” or “FUZZ.” This will add more high-end than the “TAPE” setting. As such, you will want to tone down the Equalizer’s PARAM 2 GAIN. I have the EQ set up this way as to augment those frequencies before hitting the distortion patch… it refines the final product into a gritter sound. I would not recommend adding an Equalizer like this in the audio-chain after the distortion patch, as the sound signal will become very muddy indeed.
—
As a final note, I have also added a dedicated sidechain tool for use with your drums. Change the AMP RELEASE settings to your liking, as I’ve found the release settings on the Compressor just doesn’t always have the right effect. You know how to sidechain, right? This is the video that taught me:
[youtube]http://www.youtube.com/watch?v=E0SE2AnEdaE[/youtube]
(PS: this sidechain is not meant to be plugged directly into the mixer like in the above video)
Retrotation
Genre: Electronica
Style: Dubstep, Glitch, Progressive
Hometown: Easton, PA
Members: Matt Olick
Retrotation on: Facebook | Soundcloud | Youtube | Hypemachine